January 2025

How to Open Sink Blockage

How to Open Sink Blockage: Step-by-Step Guide for Effective Drain Cleaning

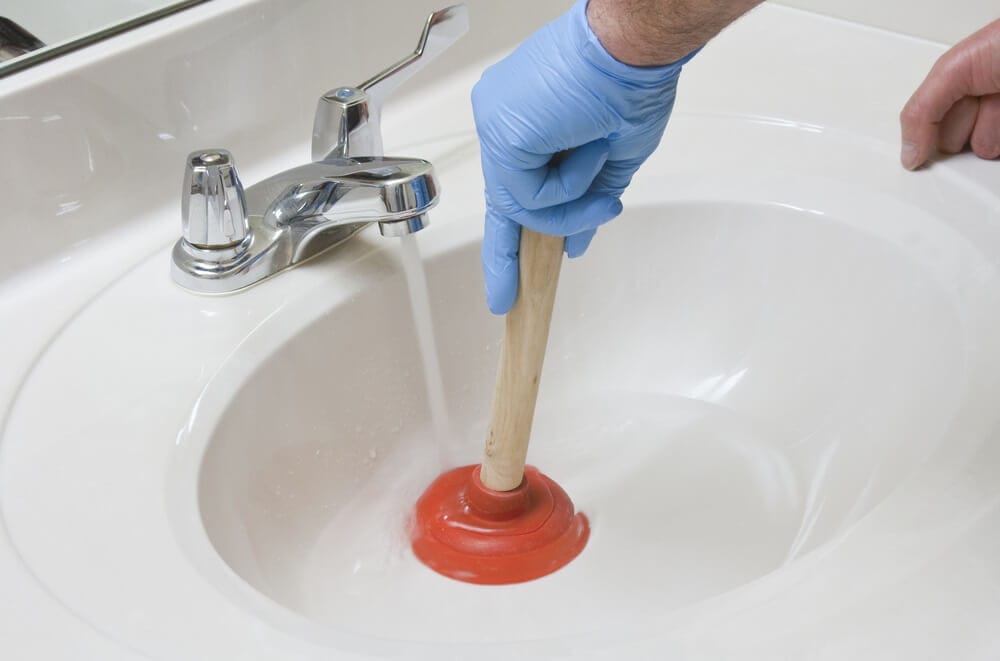
This comprehensive guide covers practical and effective solutions for clearing sink blockages. It provides a detailed step-by-step approach, highlighting common causes, essential tools, and DIY remedies. Readers will learn how to use safe homemade solutions, handle stubborn clogs, and identify when to seek professional help. Preventive tips and expert advice are included to help maintain a clog-free sink.

Common Causes of Sink Blockage

Understanding the causes of sink blockages is essential for effective solutions. Below are the most frequent culprits and explanations to help you prevent them:

1. Food Residue Buildup

Small food particles often get trapped in the sink drain, causing clogs over time. Avoid disposing of leftover food directly into the sink. Consider installing a sink strainer to catch these particles and regularly clean it to ensure water flows freely.

2. Soap Scum Accumulation

Soap residue can combine with other debris to form a stubborn clog. This issue is particularly common in bathroom sinks where bar soaps are frequently used. Switching to liquid soap can minimize this problem.

3. Grease and Fat Deposits

Cooking oil and grease solidify when they cool, leading to severe blockages. Never pour grease directly into the drain. Instead, collect it in a container and dispose of it with regular waste.

4. Foreign Objects in the Drain

Small items like jewelry, utensils, or bottle caps can accidentally fall into the sink, obstructing the flow of water. Always use drain covers, and exercise caution when handling small items near the sink.

5. Mineral Deposits

In areas with hard water, mineral deposits can build up inside the pipes, narrowing the passage for water. Descaling treatments and water softeners can help mitigate this issue.

For professional assistance with sink blockages and other plumbing issues, visit our plumbing services page in Dubai to get reliable solutions.

Tools Required for Sink Blockage Cleaning

Gathering the right tools ensures a smooth and effective drain cleaning process. Below are essential tools you should have:

  • Plunger: Creates suction to dislodge clogs. Select a sink-specific plunger for better results.
  • Drain Snake: A flexible tool for clearing deep blockages. Opt for one with a durable handle for ease of use.
  • Baking Soda and Vinegar: Natural cleaning agents that are eco-friendly and safe for pipes.
  • Wrench: For disassembling pipes when manual cleaning becomes necessary.
  • Bucket and Gloves: Essential for catching water and protecting your hands during cleaning.
  • Wire Brush: Useful for scrubbing debris from pipe joints.

Step-by-Step Guide to Open a Blocked Sink

Follow these steps to clear a blocked sink effectively and safely:

Step 1: Initial Inspection

Remove the drain cover and inspect for visible debris. Use gloves to remove any reachable obstructions. Shine a flashlight down the drain if needed to identify the blockage location.

Step 2: Use Boiling Water for Mild Clogs

Boil a pot of water and pour it slowly into the drain. This can dissolve grease and loosen minor clogs. Repeat the process if necessary.

Step 3: Apply Baking Soda and Vinegar Solution

  • Pour half a cup of baking soda into the drain.
  • Follow with half a cup of vinegar.
  • Cover the drain with a plug and wait for 10-15 minutes.
  • Flush with hot water.

Step 4: Plunge the Drain

  • Fill the sink with enough water to cover the plunger head.
  • Position the plunger over the drain and pump vigorously.
  • Check if the water drains properly. Repeat if necessary.

Step 5: Use a Drain Snake for Tough Clogs

  • Insert the drain snake into the pipe.
  • Rotate and push it until you feel resistance.
  • Pull out the snake to remove the clog. Clean the tool thoroughly after use.

Step 6: Disassemble and Clean the P-Trap

  • Place a bucket under the sink to catch water.
  • Use a wrench to loosen the P-trap.
  • Remove and clean the trap thoroughly with a brush and water.
  • Reattach the P-trap and test the sink to ensure the blockage is cleared.

Step 7: Flush the Drain Completely

After clearing the blockage, pour hot water down the drain to ensure any remaining debris is flushed away.

Homemade Drain Cleaners vs Chemical Drain Cleaners

Homemade Drain Cleaners

  • Pros: Safe, eco-friendly, and cost-effective.
  • Cons: May not work for severe clogs. Effective mainly for light blockages.

Chemical Drain Cleaners

  • Pros: Effective for stubborn clogs, especially in kitchen sinks.
  • Cons: Can damage pipes and pose health risks. Use with caution and proper ventilation.

Looking for expert plumbing solutions? Check out our best plumbing services in Dubai for efficient and affordable repairs.

Preventive Measures to Avoid Sink Blockages

Preventing blockages is easier and more cost-effective than fixing them. Implement these tips to keep your sink drains clear:

  • Regular Drain Cleaning: Flush the drain with hot water weekly to dissolve grease and soap scum.
  • Proper Food Disposal: Always use a sink strainer to catch food particles, and clean the strainer regularly.
  • Grease Management: Pour grease into a separate container and dispose of it in the trash.
  • Avoid Soap Scum: Switch to liquid soap instead of bar soap to reduce residue buildup.
  • Hard Water Solutions: Install a water softener or use descaling agents to prevent mineral deposits.
  • Monthly Baking Soda Flush: Pour baking soda and hot water down the drain monthly to maintain a clean pipe interior.

When to Call a Professional Plumber

Sometimes, professional help is necessary to resolve sink blockages. Here are signs that it’s time to contact a plumber:

  • Persistent Blockages: If DIY methods fail to clear the clog.
  • Slow Drainage: When water drains slowly despite cleaning efforts.
  • Water Backflow: Indicates a severe clog or pipe damage.
  • Unusual Odors: Foul smells from the drain can signal a deeper issue, such as a broken pipe or sewer line problem.
  • Visible Pipe Leaks: Leaks may require immediate professional attention.

FAQs on Sink Blockages

1. Can I use bleach to clear a blocked sink?

Bleach is not recommended as it does not dissolve clogs effectively. Opt for baking soda and vinegar instead.

2. Is it safe to use a plunger on a kitchen sink?

Yes, but ensure you use a sink-specific plunger. Be cautious not to apply excessive force.

3. How often should I clean the sink drain?

Cleaning the drain once a week with hot water can prevent blockages and keep your pipes in good condition.

4. What should I do if a chemical cleaner does not work?

Avoid using additional chemicals as they may damage pipes. Try mechanical methods like a drain snake or contact a professional.

5. Can I prevent blockages entirely?

While it’s impossible to guarantee, regular maintenance, proper disposal habits, and preventive measures can significantly reduce the chances.

How to Open Sink Blockage: Step-by-Step Guide for Effective Drain Cleaning Read More »

Uncategorized
AC Coil Cleaning Benefits

AC Coil Cleaning Benefits: A Complete Guide to Better Cooling and Energy Savings

This article explains the importance of cleaning AC coils and explores its many benefits, including improved cooling, energy efficiency, and better indoor air quality. It provides practical insights on recognizing when AC coils need cleaning, the tools and techniques involved, and the advantages of professional services. Readers will also learn how clean coils enhance the health and lifespan of their air conditioners while reducing long-term costs. The guide covers essential tips for selecting reliable AC coil cleaning services and emphasizes the seasonal importance of regular maintenance.

AC Coil Cleaning Benefits: A Comprehensive Guide

1. What is AC Coil Cleaning?

AC coil cleaning is the process of removing dirt, dust, and debris from the coils of an air conditioning unit. AC systems have two main types of coils:

  • Evaporator Coil: Located indoors, it absorbs heat from the air inside the room.
  • Condenser Coil: Located outdoors, it releases the absorbed heat into the atmosphere.

When these coils accumulate dirt, they lose efficiency, making it harder for the AC to cool or heat the air effectively. Regular cleaning ensures your system operates at its best, maintaining optimal airflow and consistent cooling performance.

2. Top Benefits of AC Coil Cleaning

  • Improved Cooling Efficiency: Clean coils help maintain consistent airflow and heat transfer, ensuring faster and more effective cooling, especially during peak summer months.
  • Lower Energy Consumption: Dirty coils force the AC to work harder, increasing energy use. Cleaning reduces power consumption and leads to noticeable savings on electricity bills over time.
  • Better Indoor Air Quality: Dirt on coils can circulate allergens, dust, and pollutants. Cleaning improves air quality, promoting healthier living conditions and reducing respiratory problems.
  • Extended AC Lifespan: Clean coils reduce strain on the AC system by optimizing performance, preventing premature wear and tear on critical components.
  • Lower Repair Costs: Routine cleaning minimizes the risk of major breakdowns. It also ensures that minor issues are detected early, avoiding expensive repairs in the future.

3. Signs Your AC Coils Need Cleaning

  • Warm air blowing from the vents instead of cool air, indicating restricted heat transfer.
  • A sudden spike in energy bills, suggesting that the AC unit is working harder than usual.
  • Dust or dirt buildup visible on or around the unit, particularly on the outdoor condenser.
  • Reduced airflow or weak cooling performance, which can affect the comfort of your living or working space.
  • Unusual noises, such as grinding or hissing sounds, coming from the AC unit due to overworked components.

4. How Often Should You Clean AC Coils?

  • Residential Use: Cleaning the coils once a year is sufficient for homes with moderate AC usage.
  • Commercial Use: Offices, retail spaces, and factories should have their AC coils cleaned every 3 to 6 months, depending on usage intensity.
  • Environmental Factors: Homes in areas with high dust, pollen, or humidity levels may require cleaning more frequently. Coastal regions may need additional attention due to salt buildup on condenser coils.

Regular AC coil cleaning is a crucial part of maintaining your cooling system. For professional AC maintenance and cleaning services in Dubai, visit our AC Maintenance and Cleaning Services page to ensure your system stays efficient and reliable year-round.

5. DIY AC Coil Cleaning vs. Professional Cleaning

  • DIY Cleaning:
    • Tools like soft brushes, vacuum cleaners, or mild coil cleaning sprays are effective for light dirt buildup.
    • DIY methods are economical but require caution to avoid damaging delicate fins or electrical components.
  • Professional Cleaning:
    • Experts use specialized tools and techniques, such as chemical cleaners and high-pressure water systems, to remove stubborn grime.
    • Professional services are recommended for thorough cleaning, especially in commercial or complex central air systems.

6. Tools and Techniques Used in AC Coil Cleaning

  • Tools: Coil brushes, fin combs, compressed air blowers, vacuums, and cleaning sprays designed specifically for HVAC systems.
  • Techniques:
    • Brushing: Ideal for light dust accumulation on evaporator coils.
    • Chemical Cleaning: Removes grease, grime, and biological growth such as mold.
    • Pressure Washing: Commonly used for outdoor condenser coils to blast away dirt without dismantling the unit.

7. The Link Between Clean AC Coils and Energy Savings

Dirty coils reduce heat transfer efficiency, forcing the AC to consume more electricity to cool the air. Studies indicate that cleaning coils can lower energy consumption by up to 15%, leading to significant utility savings over the lifespan of the unit. These savings not only benefit your wallet but also contribute to a greener, more sustainable environment.

8. The Health Benefits of Clean AC Coils

  • Allergy Relief: Regular cleaning reduces the circulation of allergens like pollen and pet dander.
  • Mold Prevention: Clean coils prevent moisture buildup, reducing the risk of mold and mildew growth.
  • Respiratory Health: Improved air quality benefits individuals with asthma or other respiratory conditions, promoting overall wellness.

9. Impact of Neglecting AC Coil Maintenance

  • Increased Wear and Tear: Dirt causes the AC unit to overheat and work harder, leading to faster component degradation.
  • Higher Costs: Neglected coils lead to higher energy bills and frequent breakdowns, increasing maintenance and repair costs.
  • System Failure: Over time, severe dirt buildup can cause total system failure, requiring expensive replacements.
  • Health Risks: Unmaintained coils can harbor bacteria and mold, compromising indoor air quality and health.

10. AC Coil Cleaning for Different Types of Air Conditioners

  • Split AC Units: These systems have both indoor and outdoor coils that require separate cleaning approaches.
  • Window AC Units: Though smaller, these units also need regular maintenance to prevent clogging and performance issues.
  • Central Air Systems: Due to their complex coil arrangements, professional cleaning is highly recommended to ensure thorough maintenance.

11. How to Choose a Reliable AC Coil Cleaning Service

  • Certifications: Verify that the service provider is licensed and insured.
  • Customer Reviews: Look for companies with high ratings and positive feedback.
  • Experience: Choose a service provider with extensive experience in HVAC maintenance.
  • Transparent Pricing: Obtain detailed quotes and avoid overly cheap services that might compromise quality.

12. Seasonal Importance of AC Coil Cleaning

  • Pre-Summer Maintenance: Clean the coils before the summer months to prepare your AC for high usage during hot weather.
  • Post-Winter Cleaning: After periods of inactivity, cleaning the coils ensures the system runs efficiently when restarted.
  • Year-Round Benefits: Regular maintenance enhances the performance of your AC system, ensuring year-round comfort and energy savings.

AC Coil Cleaning Benefits: A Complete Guide to Better Cooling and Energy Savings Read More »

Uncategorized
How to Prepare Walls Before Painting Dubai Homes

How to Prepare Walls Before Painting Dubai Homes

Preparing walls before painting is essential for achieving a smooth and durable finish. This guide focuses on preparing walls in Dubai homes, considering the unique environmental factors like humidity and dust. Follow these steps for professional-quality results, ensuring your painting project stands the test of time.

Introduction

Proper wall preparation ensures paint adheres well and lasts longer. Dubai’s climate, characterized by high humidity and frequent dust, poses challenges that must be addressed during preparation. By tackling these issues effectively, you not only achieve a flawless finish but also prevent common problems like peeling paint and surface imperfections. Whether you’re repainting or starting fresh, understanding the preparation process is critical for success.

Understanding Wall Conditions in Dubai

Common Wall Issues in Dubai Homes

  • Cracks and Holes: Common in homes due to settling, structural shifts, or temperature changes. These need to be repaired to prevent uneven paint surfaces.
  • Damp Spots: High humidity or occasional plumbing leaks can cause dampness, leading to mold and mildew growth if not addressed.
  • Dust Accumulation: Dubai’s sandy environment often results in fine dust layers that must be removed for proper paint adhesion.

Impact of Weather Conditions

  • High humidity can cause the paint to dry unevenly or lead to bubbling.
  • Temperature fluctuations can stress wall materials, leading to cracks or peeling paint.
  • Exposure to intense sunlight may fade or weaken improperly prepared surfaces over time.

Types of Walls in Dubai Homes

  • Plastered Walls: Common and require thorough priming to prevent moisture absorption.
  • Cement Walls: Durable but often need extensive cleaning to remove dust and grime.
  • Drywall: Lightweight and prone to dents or damage, requiring careful sanding and repair.

Tools and Materials Needed for Wall Preparation

Essential Tools

  • Scraper for removing old paint or debris.
  • Sandpaper in various grits (medium for rough sanding, fine for finishing).
  • Putty knife for applying fillers.
  • Ladder to reach high areas.
  • Cleaning cloths, sponges, or a soft-bristle brush.

Specialized Materials

  • High-quality wall filler or putty for cracks and holes.
  • Moisture-resistant primer to combat humidity.
  • Mild detergent or eco-friendly cleaning agents.
  • Masking tape to protect trim and adjoining areas during painting.

Eco-Friendly Alternatives

  • Replace chemical cleaners with natural solutions like a vinegar-water mixture.
  • Opt for low-VOC (volatile organic compounds) fillers and primers to ensure healthier indoor air quality.

Budget-Friendly Options

  • Buy tools and materials from local suppliers offering discounts.
  • Use multipurpose products, such as primers that also seal and protect walls.
  • Borrow or rent less frequently used tools like ladders or power sanders.

Step-by-Step Guide to Preparing Walls Before Painting

Step 1: Inspection

  • Carefully examine walls for visible issues like cracks, peeling paint, or discoloration.
  • Check for underlying dampness by touching suspicious areas or using a moisture meter.
  • Identify mold or mildew, particularly in poorly ventilated spaces.
  • Mark all problem areas needing special attention.

Step 2: Cleaning the Walls

  • Start by dusting walls with a dry cloth or vacuum cleaner equipped with a brush attachment.
  • Wash the walls using a mixture of mild detergent and water. Focus on areas with stains or grease.
  • For particularly dusty or grimy walls, consider using a sponge mop for easier cleaning.
  • Allow walls to air dry completely to prevent moisture from interfering with the paint application.

Step 3: Fixing Cracks and Holes

  • Remove loose paint or debris around damaged areas using a scraper.
  • Fill small cracks and holes with wall filler or putty, applying it smoothly with a putty knife.
  • For larger holes, consider using a patching kit for added strength.
  • After the filler dries, sand the area with fine-grit sandpaper until it is flush with the surrounding wall.

Step 4: Priming the Walls

  • Select a primer suited for high-humidity environments to prevent moisture-related issues.
  • Use a roller for broad areas and a brush for corners or intricate spots.
  • Apply a thin, even coat of primer, ensuring no streaks or missed spots.
  • Let the primer dry fully, typically for 24 hours, to create a solid base for painting.

Step 5: Final Sanding and Wiping

  • Conduct a final sanding over the entire surface to ensure a uniform texture.
  • Wipe the walls with a damp cloth to remove all sanding dust.
  • Double-check the surface for any imperfections and address them before painting begins.

Common Mistakes to Avoid

  • Skipping Cleaning: Dirt, dust, and grease can cause paint to bubble or peel prematurely.
  • Neglecting Primer: Primer not only improves paint adhesion but also enhances the vibrancy and durability of the paint color.
  • Using Improper Tools: Substandard tools can leave streaks or uneven finishes.
  • Rushing Through Repairs: Ensure all fillers and primers are completely dry before proceeding.

Tips for Effective Wall Preparation in Dubai

  • Choose the Right Time: Plan your painting project during cooler, low-humidity months like December to February.
  • Invest in Quality Materials: High-quality products may cost more upfront but save money in the long run by lasting longer.
  • Ensure Proper Ventilation: Good airflow reduces drying time and prevents moisture buildup.
  • Adopt Sustainable Practices: Select eco-friendly, low-VOC materials to protect your health and the environment.

Professional Wall Preparation Services in Dubai

When to Hire a Professional

  • If you encounter widespread damage, such as extensive cracks or mold growth.
  • For large-scale projects where time and precision are critical.

Benefits of Professional Services

  • Professionals bring advanced tools, expertise, and materials that ensure superior results.
  • They are equipped to handle Dubai-specific challenges, like high humidity and dust.
  • Hiring a professional saves time and effort, especially for inexperienced DIYers.

Average Costs

  • Wall preparation typically costs AED 10–25 per square meter, depending on the extent of repairs.
  • Full painting services range from AED 15–50 per square meter, influenced by the quality of materials and labor.

For a flawless paint job, proper wall preparation is crucial. If you’re looking for professional assistance, check out our Painting Services to transform your home with expert care. Our team ensures a smooth and durable finish tailored to your needs.

FAQ

Q: How long does wall preparation take?

A: Depending on the condition of the walls, it usually takes 1–3 days, including drying times for repairs and primer.

Q: Can I paint over damp walls?

A: No. Damp walls should be treated and allowed to dry completely to prevent future issues like mold or bubbling paint.

Q: What is the best primer for humid conditions?

A: Moisture-resistant primers, specifically designed for tropical or high-humidity environments, work best.

Q: Do I need to remove old paint before repainting?

A: Only if the old paint is flaking or uneven. In most cases, cleaning and sanding are sufficient.

Conclusion

Proper wall preparation is the foundation of a successful paint job. By addressing cracks, dampness, and dust effectively, you ensure a smooth and long-lasting finish. While DIY preparation is feasible, hiring professionals can save time and guarantee quality results. A well-prepared wall not only improves the aesthetic appeal of your home but also protects your investment, ensuring your walls remain vibrant and flawless for years to come.

How to Prepare Walls Before Painting Dubai Homes Read More »

Uncategorized
Energy-Saving Tips for Dubai Apartment Residents

Comprehensive Energy-Saving Tips for Dubai Apartment Residents

This article, titled “Top Energy-Saving Tips for Dubai Apartments”, provides a comprehensive guide to reducing energy consumption in Dubai’s residential spaces. It addresses the unique challenges faced by apartment dwellers, including high cooling costs, water conservation, and lighting efficiency. The article explores practical solutions like smart home technology, renewable energy adoption, and energy-efficient appliances while highlighting cost savings and environmental benefits. Designed for residents seeking actionable advice, it offers a clear, precise, and engaging roadmap to sustainable living in Dubai.

Top Energy-Saving Tips for Dubai Apartments

Introduction

Energy-saving is essential for apartment dwellers in Dubai. Rising energy costs and high electricity consumption make it critical to adopt sustainable practices. Small changes, such as optimizing appliance use and improving cooling efficiency, can significantly lower energy bills. This article offers actionable tips tailored to Dubai’s unique climate and energy demands. Additionally, adopting energy-saving habits contributes to environmental sustainability and helps residents align with Dubai’s green initiatives.

Understanding Dubai’s Energy Challenges

Dubai experiences extreme heat, which leads to heavy reliance on air conditioning. With DEWA (Dubai Electricity and Water Authority) rates based on consumption slabs, excessive usage can result in high bills. Many apartments also lack adequate insulation, causing cooling systems to overwork. Sustainable living is crucial to reduce costs and lessen environmental impact in this urban landscape. Additionally, Dubai’s ambitious sustainability goals, such as the Dubai Clean Energy Strategy 2050, emphasize the need for residents to adopt energy-efficient practices.

Efficient Cooling Solutions

  1. Choose Energy-Efficient Air Conditioners: Select models with high energy efficiency ratings. Look for those labeled with an Energy Star certification to ensure optimal performance. Split AC units often provide better energy savings compared to window units.
  2. Regular Maintenance: Clean AC filters monthly to improve airflow and efficiency. Dirty filters force units to work harder, consuming more energy. Schedule professional servicing annually to ensure optimal performance.
  3. Smart Thermostats: Install programmable thermostats to control cooling based on time of day. Set temperatures higher when away and cooler during occupancy. Smart thermostats also allow remote adjustments via smartphone apps.
  4. Curtains and Blinds: Use blackout curtains or reflective blinds to block direct sunlight, reducing indoor heat and AC usage. Consider investing in thermal curtains for enhanced insulation.
  5. Strategic Furniture Placement: Ensure air vents are not blocked by furniture to maintain efficient airflow.

Optimizing Lighting in Apartments

  1. Switch to LED Bulbs: LEDs consume less energy and last longer than traditional incandescent or halogen bulbs. They are available in various color temperatures to suit different spaces.
  2. Maximize Natural Light: Keep windows clean and use light-colored curtains to brighten spaces naturally during the day. Position mirrors strategically to reflect light into darker areas.
  3. Motion Sensor Lighting: Install motion-sensor lights in areas like hallways and bathrooms to reduce unnecessary usage. Pair them with dimmable LED bulbs for further efficiency.
  4. Use Timers for Outdoor Lighting: If your apartment includes outdoor lighting, install timers or light sensors to ensure lights only operate when needed.

For professional assistance with energy-efficient solutions in your home, check out our Electrical Services in Dubai. From upgrading to energy-efficient appliances to expert maintenance, we ensure your apartment runs efficiently. Let us help you save energy and reduce costs today!

Appliances and Their Energy Use

  1. Energy-Efficient Appliances: When purchasing, choose appliances with high energy ratings. Refrigerators, washing machines, and ovens with Energy Star labels consume less electricity. Consider inverter technology for air conditioners and refrigerators.
  2. Unplug Devices: Devices on standby mode still consume energy. Unplug chargers, TVs, and microwaves when not in use. Use power strips with on/off switches to simplify this process.
  3. Smart Usage: Run appliances like dishwashers and washing machines during off-peak hours to reduce energy costs. Always run full loads to maximize efficiency.
  4. Microwave Over Ovens: Use microwaves instead of ovens for reheating food as they consume less energy and heat food faster.

Water Conservation Tips

  1. Low-Flow Fixtures: Install low-flow faucets and showerheads to reduce water usage without sacrificing performance. Aerated fixtures can also help maintain water pressure while conserving water.
  2. Fix Leaks: A dripping tap can waste gallons of water over time. Regularly check for and repair leaks. Monitor your DEWA water usage for any unusual increases that might indicate hidden leaks.
  3. Efficient Washing Machines: Use washing machines with high water efficiency ratings and opt for cold washes when possible. Avoid pre-washing clothes unless absolutely necessary.
  4. Dual-Flush Toilets: If possible, install dual-flush toilet systems to control water usage during each flush.

Renewable Energy Options

  1. Solar Panels: Install solar panels on balconies to harness renewable energy for small appliances. Portable solar chargers can also be used for gadgets like phones and laptops.
  2. Government Incentives: Explore DEWA programs that encourage renewable energy adoption in residential buildings. The Shams Dubai initiative allows residents to connect solar systems to the grid.
  3. Community Solar Initiatives: Participate in shared solar panel projects within apartment complexes. Advocate for your building management to consider renewable energy solutions.
  4. Solar Water Heaters: If permitted, consider solar water heating systems to reduce electricity consumption for heating water.

Smart Home Technology

  1. Smart Plugs: Use smart plugs to monitor and control the energy consumption of specific devices. These plugs can also be set to turn off devices automatically during inactivity.
  2. Home Automation: Automate lighting, cooling, and appliances with smart home hubs for optimized energy use. Popular systems like Alexa or Google Home integrate easily with smart devices.
  3. Energy Monitoring Apps: Track and analyze energy consumption patterns to identify areas for improvement. Apps provided by DEWA or third-party solutions offer detailed insights.
  4. Voice-Controlled Systems: Reduce energy use by controlling devices hands-free, ensuring lights or appliances are turned off when leaving the room.

Insulation and Ventilation

  1. Seal Gaps: Use weatherstripping to seal gaps in windows and doors, preventing cooled air from escaping. Draft stoppers can be added to doors for better insulation.
  2. Window Insulation: Apply insulating films to windows to reduce heat transfer. Consider double-glazed windows if your building permits upgrades.
  3. Ceiling Fans: Use ceiling fans to circulate air, making rooms feel cooler and reducing the need for air conditioning. Reverse the fan direction during cooler months to distribute warm air.
  4. Ventilation: Keep exhaust fans in kitchens and bathrooms clean to maintain efficiency and prevent overheating.

Educating Residents

  1. Promote Energy-Saving Habits: Encourage family members to turn off lights, unplug devices, and close curtains during peak sunlight hours. Make energy-saving a shared goal within households.
  2. Community Workshops: Organize informational sessions within apartment buildings to spread awareness about energy conservation. Partner with local organizations for expert-led workshops.
  3. DEWA Tips and Programs: Leverage DEWA’s resources for expert advice on reducing energy consumption. Explore their app for real-time energy usage updates and alerts.
  4. Green Living Challenges: Create friendly competitions within the apartment community to see who can save the most energy in a month.

Cost Benefits of Energy Saving

  1. Monthly Savings: Implementing these tips can lower monthly utility bills by 20-30%. The exact savings depend on the extent of changes adopted.
  2. Long-Term Financial Benefits: Energy-efficient appliances and practices reduce costs over time. For example, LED bulbs last significantly longer, reducing replacement costs.
  3. Environmental Impact: By conserving energy, residents contribute to reducing carbon emissions and promoting sustainability. These efforts align with global goals to combat climate change.
  4. Enhanced Property Value: Apartments with energy-saving features are often more attractive to buyers or renters, increasing their market value.

Conclusion

Energy-saving practices in Dubai apartments are simple yet impactful. From efficient cooling solutions to smart home technologies, small changes can lead to significant financial and environmental benefits. These efforts not only reduce utility bills but also contribute to Dubai’s vision of sustainable urban living. Begin implementing these tips today to enjoy lower bills and a greener future. For additional resources, explore DEWA’s website or consult energy-saving experts in your area. Encourage neighbors and communities to adopt these strategies collectively for greater impact.

Comprehensive Energy-Saving Tips for Dubai Apartment Residents Read More »

Uncategorized